How to create your first app or project in Android Studio 2023: A Step-by-Step Guide
How to Make an Android App
Welcome to the world of Android app development! Creating your first app or project in Android Studio can be an exciting and rewarding experience. In this article, we will guide you through the step-by-step process of creating your very first app using Android Studio 2023.Android Studio is the official integrated development environment (IDE) for Android app development. It provides a comprehensive set of tools to help you build, test, and deploy Android apps.
Step 1: Install Android Studio
Before diving into app development, make sure you have Android Studio installed on your computer. You can download the latest version from the official Android Studio website at https://developer.android.com/studio. Follow the installation instructions provided for your operating system.
Step 2: Launch Android Studio
Once you have installed Android Studio, launch the application. You will be greeted with the Welcome screen, which provides options for creating a new project or opening an existing one.
Step 3: Create a New Project
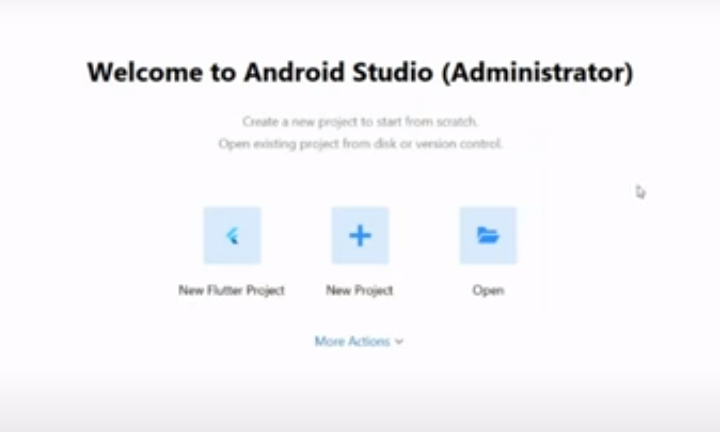
To create a new project, click on “Start a new Android Studio project” on the Welcome screen. This will initiate the project creation process.
Step 4: Configure Your Project
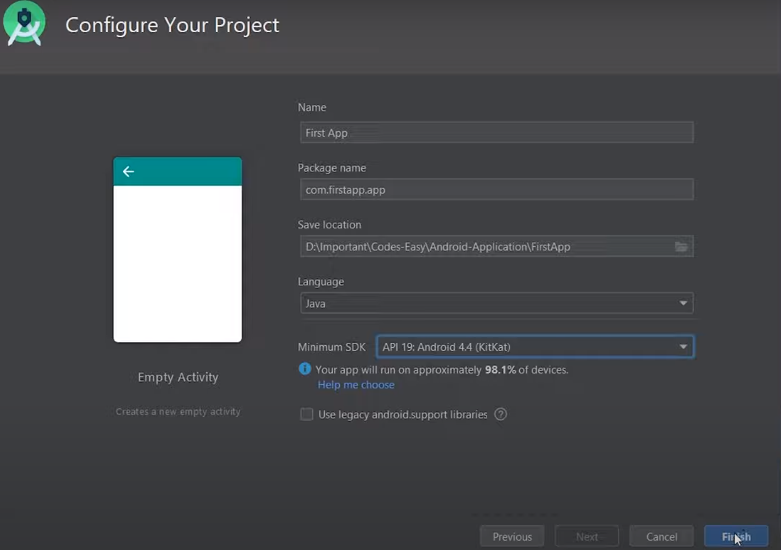
During project configuration, you will need to set various parameters:
- Application Name: Give your app a name that reflects its purpose and functionality. Select the Empty Activity template and click Next.
- Package Name: This uniquely identifies your app and follows the Java package naming convention (e.g., com.example.myapp).
- Project Location: Specify the directory where you want to save your project files.
- Language: Choose between Java and Kotlin as the programming language for your app.
- Minimum SDK: Select the minimum Android version your app will support.
Here are some additional tips for creating your first Android app:
- Start with a simple app. Don’t try to build something too complex for your first app.
- Use the Android Studio tutorials. Android Studio provides a number of tutorials that can teach you the basics of Android app development.
- Don’t be afraid to ask for help. There are many online forums and communities where you can get help with Android app development.
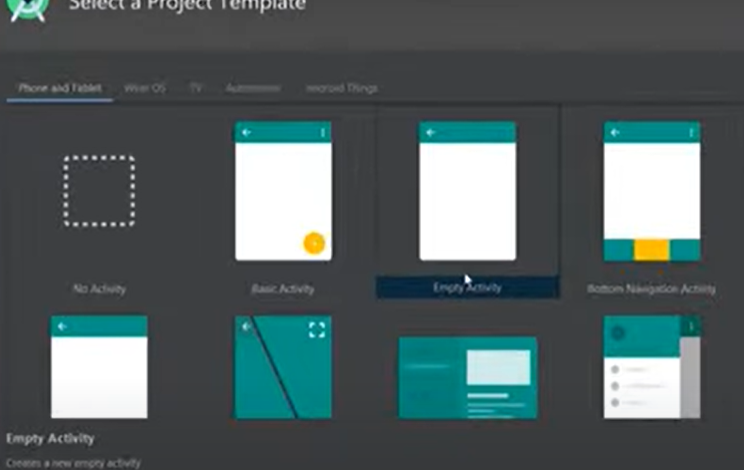
Step 5: Choose an App Template
Android Studio provides several app templates to help you get started. You can choose from templates like Basic Activity, Empty Activity, or even a Navigation Drawer template. Select the template that best suits your needs. The chosen template will provide you with pre-generated code and layout files.
Step 6: Design the User Interface (UI)
Android Studio offers a visual layout editor that allows you to design the UI of your app. Using the editor, you can drag and drop UI components onto the canvas and customize their attributes. Create the desired layout by arranging components such as buttons, text views, and images.
Step 7: Write Your Code
The code editor in Android Studio is where you will write the logic for your app. Depending on your chosen programming language, Java or Kotlin, you can handle user interactions, perform calculations, make network requests, and implement various functionalities. Android Studio provides code completion, debugging tools, and other features to facilitate your development process.
Step 8: Test and Debug
Testing and debugging are crucial steps in app development. Android Studio provides tools for testing your app on emulators or physical devices. You can run your app, interact with it, and identify any issues or bugs that need to be fixed. Utilize the debugging tools to step through your code, set breakpoints, and analyze the app’s behavior.
Step 9: Build and Distribute
Once you have refined your app and ensured its stability, it’s time to prepare it for release. Android Studio allows you to build the app, generating an APK (Android Package) file. This APK can be distributed to users through the Google Play Store or other app distribution platforms.
Congratulations on creating your first app or project in Android Studio 2023! This article has guided you through the essential steps, from installation to app distribution. Remember to continue exploring the vast resources available, such as official Android documentation, online tutorials, and developer communities, to further enhance your app development skills.
If you have any further questions or need additional assistance, feel free to ask. Happy coding!